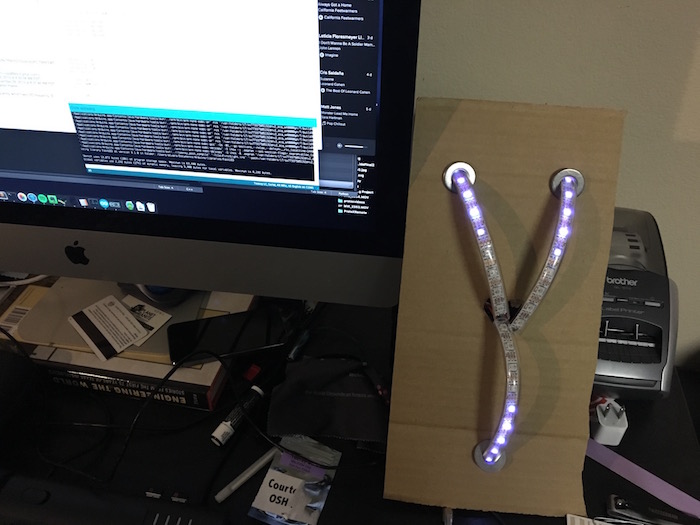
This year’s work holiday party was Back to the Future themed. I didn’t have any good costume ideas, so with a week to go, I decided to build a portable flux capacitor to bring instead.
I bought some clear tubing at the hardware store and cut the LED strips to size. I then used a Teensy LC that I got at the Hackaday Superconference with the FastLED library to start playing with the LEDs.
After last years DEFCONBOTS competition, I decided to try something completely different. (Check out last year’s robot.) Having to move the entire turret/camera/laser around is incredibly inefficient. If the goal is to shoot things with lasers, the only thing moving should be the laser beam.
While doing some research, I found various projects with home-made galvanometers. I did not trust myself to actually build something even remotely close to working like that in time for the competition, so I turned to eBay instead. I found some relatively cheap laser show controllers which included two galvanometers (and drivers), along with the mount and mirrors.
The last turret update (with actual content) happened back in February. I continued working on it through August, taking it both to Maker Faire and DEFCON. I had planned on writing about it back then, but never really got around to it… This post covers the mechanical aspects of the project. I’ll write about the electrical/firmware/software some other time.
The last post covered some initial progress with servos and basic software. I decided that platform was not going to work and continued experimenting with other alternatives. The next thing I tried were stepper motors. I figured having absolute position control would be useful when trying to point a laser somewhere.
I just switched to using Jekyll instead of Wordpress for this site. I started hosting it on a VPS and don’t want to have to deal with all the apache/php/mysql security issues. Now I just use Jekyll to make a static site and run it on nginx (the nginx part was just for fun).
There might be some bugs due to the importing of old posts from wordpress/blogger. Let me know if you find one so I can fix it :D
I’m still recovering from Maker Faire last weekend. Here’s a quick video about the laser shooting gallery we set up.
The laser turret was there as well, but playing against other people was much more entertaining. Time permitting, I’ll post details about the exhibit and how it works.
Over the past month, I’ve been working on a laser turret for the DefconBots autonomous robot competition this Summer. I entered the same competition back in 2006 and enjoyed the experience, so I figured I’d give it another try. Since I am fairly comfortable wiring firmware, I plan on focusing on the mechanical aspects of this project, as well as the image processing (both of which I know little about.) It should be a fun project and great learning experience. Here is some of the progress I’ve made since I started:
I’ve been using the Dangerous PrototypesBus Blaster along with openOCD to program/debug my LPC1769 microcontroller. It’s been a while since I did anything, so when I tried again last week and couldn’t get it to work, I was slightly confused. The only change (that I was aware of) was an OSX upgrade from Mountain Lion to Mavericks.
Whenever I tried to run openOCD, I would get the following error:
Error: unable to open ftdi device: unable to claim usb device. Make sure the default FTDI driver is not in use
A few days ago, I found out that you can send video messages to people via Skype. Someone asked me if I knew of a way to export them from Skype. (That way you can watch them while offline, back them up for later, or whatever else you might want to do.)
After searching around the web for a while, I realized that there is no such feature at the moment. I also saw many people suggesting an SQLite browser add-on for firefox.
Soon after I bought my Kinesis Freestyle 2 Keyboard, I noticed that the media keys (next/previous song) did not work with Spotify on OSX. The strange part is that they work just fine on iTunes. I decided to email the Kinesis tech support to see if they had a solution.
Kinesis support was extremely quick to respond and informed me that this was a known problem and was fixed in the latest batch of keyboards. They offered to update the firmware on mine for free, but that required me sending them my keyboard (which is awesome!). I didn’t want to do that, so I figured, If they can update the firmware on this thing, so can I!
After getting the gcc-arm compiler working with the mbed, I decided to take a look at my LPCXpresso LPC1769 development board. The mbed is really easy to program. It mounts as a flash drive and you just drag and drop the binary file onto it. Unfortunately, that’s it. There is no way to get any debug information out of it. The LPCXpresso, on the other hand, comes with a nice LPC-link board attached just for this purpose. Unfortunately(again), it only works with certain IDE’s, like code_red. I cut the lpc-link board off and instead used a BusBlaster from Dangerous Prototypes along with OpenOCD. It took me a while to actually program the device, so I’ll leave that for later. This post is about debugging!