Weather Station Project Overview
I’m not sure exactly when I became interested in building a weather station. It was at least year or two ago… I remember seeing the Project Curacao 2 post on the SwitchDoc Labs page and thinking it would be fun to build something like it, but much more integrated. I’ve also never worked on “outdoor” projects and want to learn more about weatherproofing, solar charging, etc… (What I really want to do eventually, is build an ultrasonic anemometer, but I told myself I won’t start down that rabbit hole until I have a fully working weather station.)
The very first goal was to get a weather station that could measure the following:
- Wind speed and direction
- Rainfall
- Barometric pressure
- Temperature
- Humidity
- Light level
First Attempts
Early on, I looked at using LoRa for radio communications, like the Curacao project. After looking at it for a while, I decided against it at first due to the much higher barrier of entry for getting something working. I might switch to it in the future though!
Since I had been working with BLE devices on other projects, the first board I made used the NRF52, which I was familiar with. The device worked, but it never made it past my workbench. The range wasn’t great (duh!) and I lost interest in the project for some time.
Second Try
After not working on the project for almost a year, I told myself I’d get something working over the winter break. I decided not to over-optimize from the start and just get something working. Outside.
I’m not sure why I decided it had to have GPS initially. Most likely because it’s fun and these projects are really just an excuse to learn new things and I hadn’t done GPS in embedded systems before. Either way, that led me to select the STM32 NUCLEO-L476RG development board to start. It had plenty of UART interfaces(radio, gps, debug) and is fairly low-power. It also has native MBED support, which is another one of those tools I wanted to play with (and would speed up development).
For the radio, I decided to go with Xbee radios since I could survive with what ends up being just a wireless serial port. Again, I’ll probably use something else eventually, but this got me going and making progress.
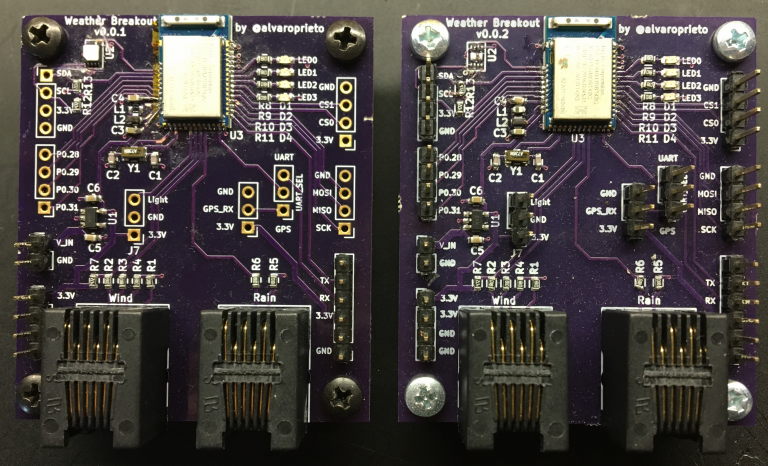
Nucleo Weather Breakout v0.1
After playing with the Nucleo board and getting a mess of cables going, I made a PCB breakout board with the Xbee header and RJ11/14 plugs for the wind and rain sensor assembly, along with some I2C, UART, and analog pins broken out.
This board let me do a great deal of FW work, as well as get a rough idea of the overall power consumption of the device.
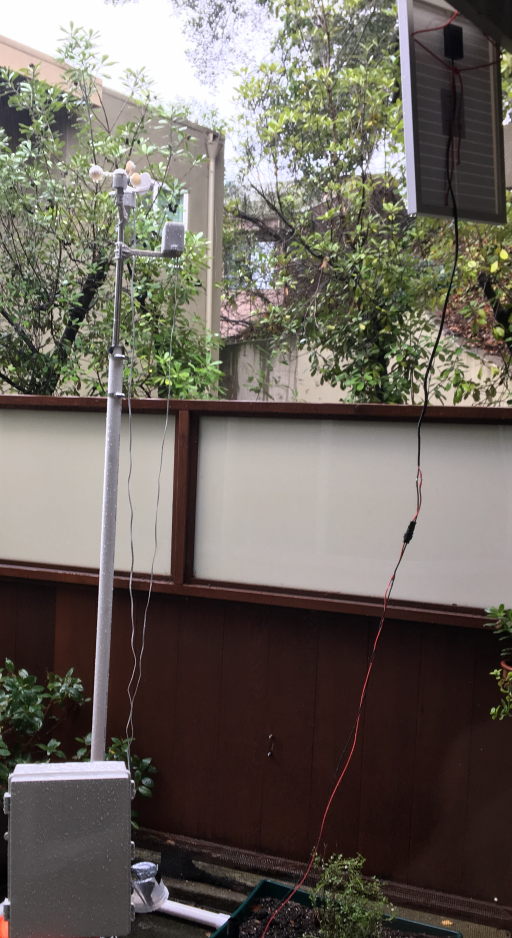
First Enclosure
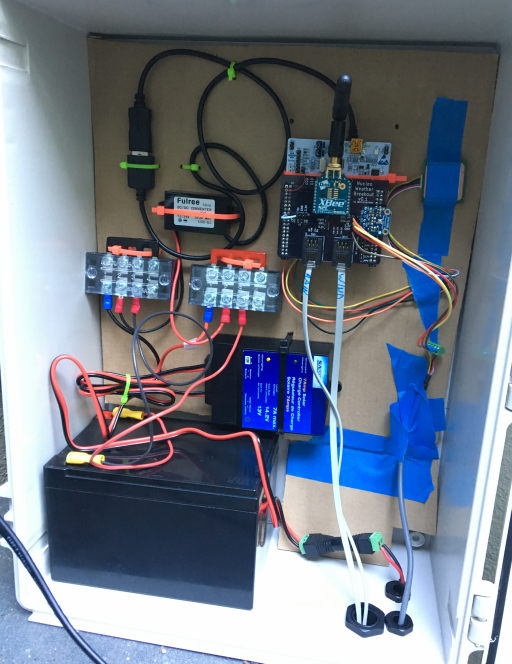
Since I wanted to have something outdoors as soon as possible, I ended up getting a huge solar panel with a huge battery and off the shelf charger/regulator. This was pretty close to the least efficient setup possible, but it worked and started measuring data outside.
I found a huge Bud Industries NBF-32026 ABS Case to use as the enclosure and found some cheap cable glands for all the cables. There was no easy way to mount all of the electronics to the box without some sort of mounting plate, which I didn’t have, so I ended up using the side of a box and zip ties.
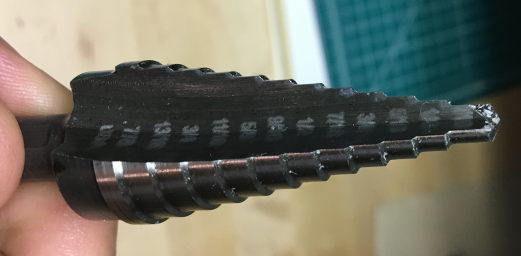
I had no idea how to go about drilling huge holes in the case, but I found a video by bigclivedotcom about using step drill bits on plastic, so I decided to give them a try. The step drill bit worked great! I had previously tried using a really wide drill bit and was unsuccessful.
Unfortunately, where I currently live, there’s no direct sunlight in the patio during wintertime. This means that even with the huge panel, I still had to manually recharge the battery every week or so. Either way, it let me do FW and backend development (computer receiving and saving the data).
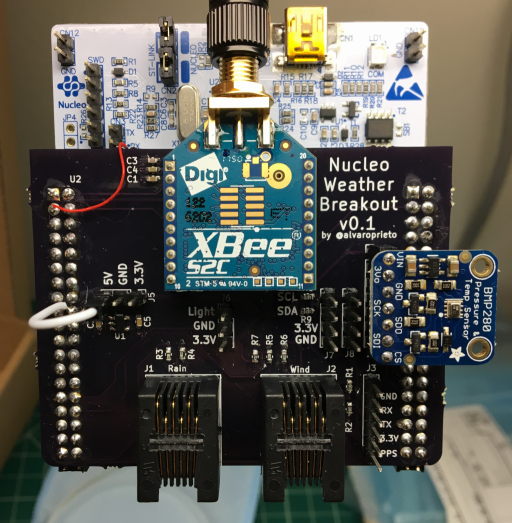
Nucleo Weather Breakout v0.2
After I had most of the FW verified, I decided to do a second breakout board. This one had a built-in low-ish power GPS and antenna, BMP280 pressure sensor, as well as fewer random headers, and a new dual RJ11/14 connector.
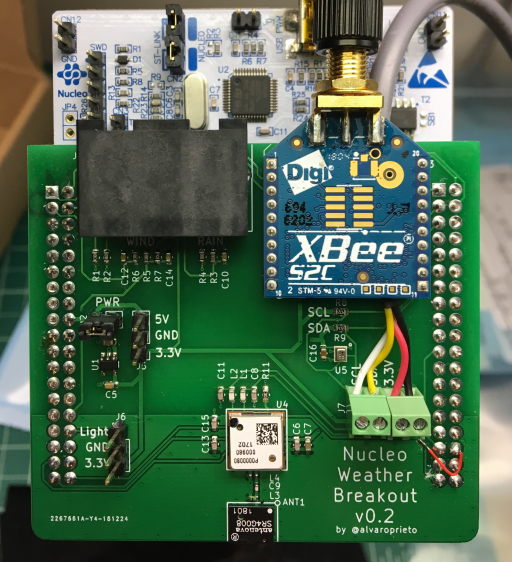
Once the second board arrived and was working (It required a few bodge wires to get working as usual), it quickly went outside for longer-term testing. Overall, I think it was outside for a few weeks before being replaced by the new model.

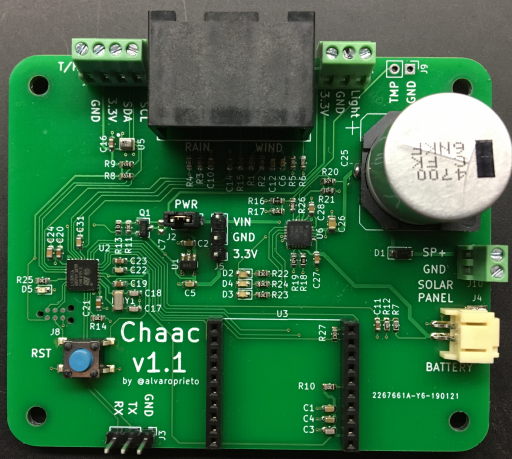
Chaac v1.0
After playing around with the breakout boards, I decided it was time to integrate it all in a single board. I named it Chaac.
This is where I ran into issues with MBED. Making the board support package (BSP) for a custom board was not trivial. Another issue was that I couldn’t get the low-power modes working quite right. At the same time, I decided to ditch GPS, since the weather station is unlikely to move without my knowledge . With the new requirements, I ended up switching to an STM32L432KC based board.
On the FW side, I decided to go back to mynewt OS, which I like and have used before. Porting the mynewt BSP was also not trivial, but I was able to do it in a couple of days. Using mynewt also gave me the benefit of using the mcuboot bootloader, which will let me do “simple” FW updates over the xbee link.
This new board has a battery charger and solar panel input (borrowed from Adafruit’s Solar Charger, STM32L432 microcontroller, BMP280, fan driver, and inputs for external temperature/humidity and environmental light sensors.
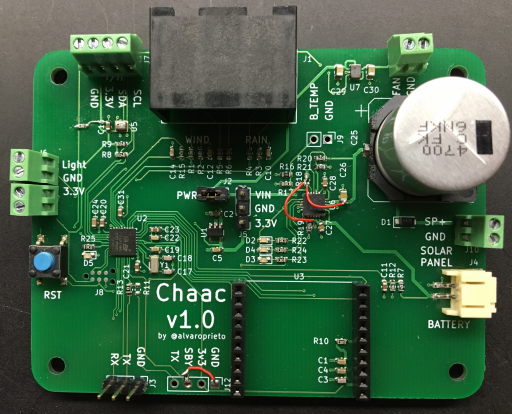
As with most new designs, I made some silly mistakes with the first version. Not having pull down resistors on the standby pin for the Xbee, having a floating boot0 pin on the STM32, mis-wiring the battery charger, etc. After lots of debugging and some reworks, the board was working well enough and went outside to replace the old setup.
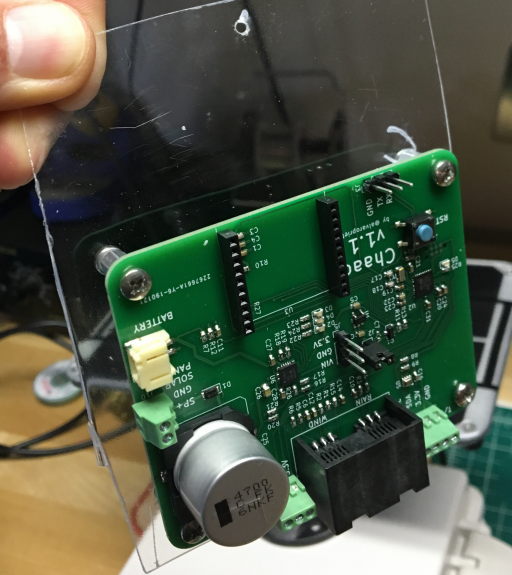
Second Enclosure

Now that the setup was much simpler/smaller, I needed to get a smaller enclosure. I found a great video by ModestMaker on YouTube which has step-by-step assembly instructions and a full parts list for a remote environmental monitoring system (Check out the description of the video for lots more details.) I used the same Bud Industries NBF-32202 Economy Box, McMaster cable glands, conduit, RAM mount for the solar panel, etc…
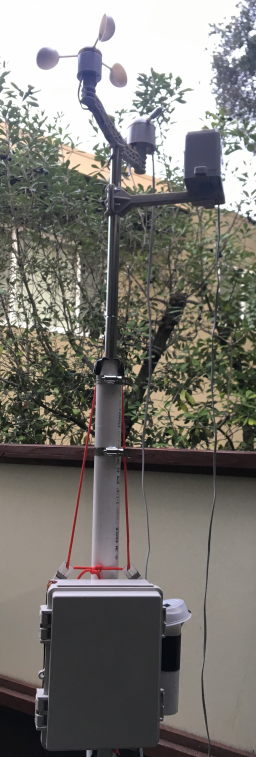
In order to mount the Chaac v1.0 board to the enclosure, I again used a piece of cardboard with holes it. It worked well enough in the short term. On the outside, I used a piece of PVC pipe and a plastic cup to shield the temperature/humidity sensor from the rain and some conformal coating to make the light sensor waterproof.

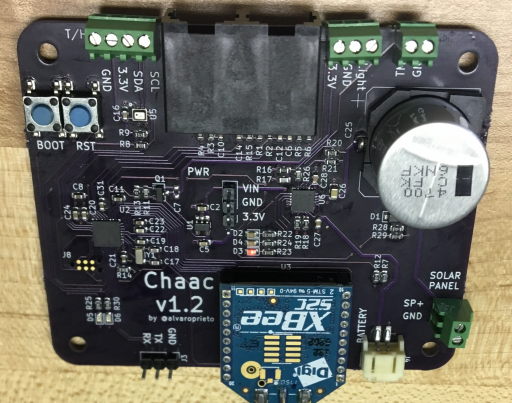
Chaac v1.1
The second revision of the chaac board included fixes for all the bodge wires in the v1.0. I removed the fan driver and gps serial input, since I didn’t think I would ever use them, and moved the light sensor connection to the bottom for simpler wiring.
Another addition was a MOSFET to disconnect the wind direction and light sensor power when not in use. This helps in lowering the power consumption when not taking a measurement. The wind direction sensor is just a resistor (that changes depending on direction, but not quite a potentiometer), so it’s always consuming power unless it’s cut-off.
Third Enclosure
Since I had one system working outside, I decided to put together a second enclosure. Being the incredibly attentive and detail oriented person that I am, I drilled the holes on the wrong side of the box. Since the solar panel cable is so short, the cable gland needs to be on the top side of the box near the door hinges, not on the bottom… I used some gorilla tape to cover up the bad holes and hoped it would keep out the water. I also tried a new method of mounting the board: a piece of cheap plastic from a disposable food container.

Chaac v1.2
The last revision of the board added solar panel voltage monitoring, a bootloader button, and moved the solar panel and battery connectors to a better location. The solar panel voltage can be used to determine whether or not the battery is being charged and also to get light levels. I wanted to see whether a separate light level sensor is worth it or not.
Fourth Enclosure
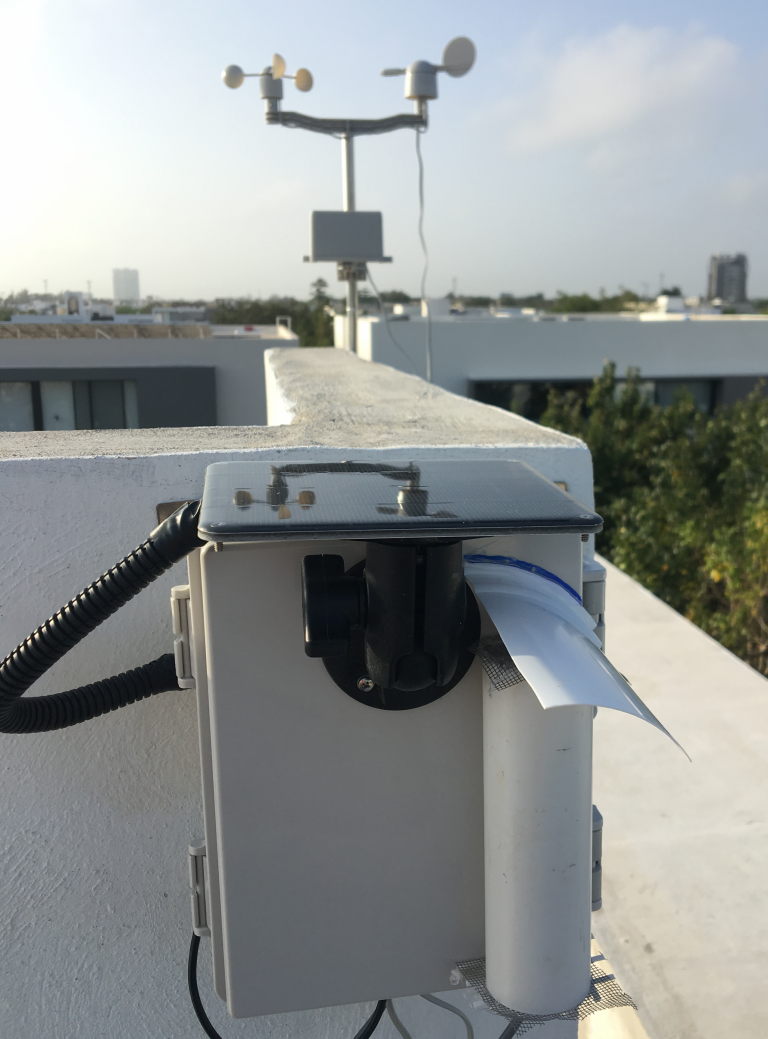
I put together one last enclosure. This one used a piece of wood for a slightly nicer backplate and had properly aligned holes.
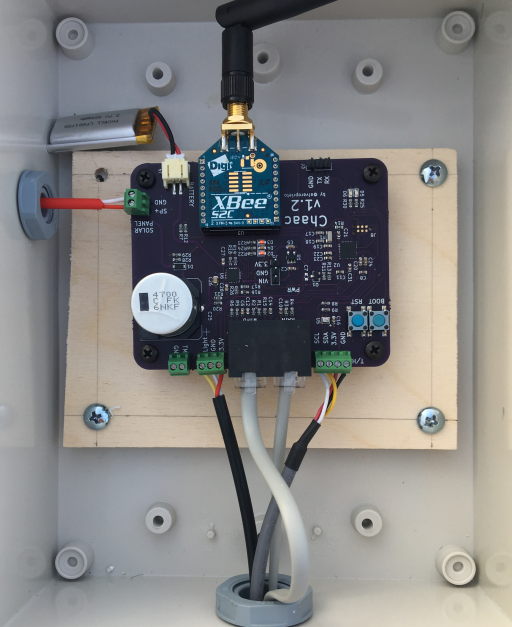
Why so many enclosures?! You might ask… This one traveled with me to Mexico when I visited my parents. My dad and I installed it on the roof of the house. For the first time, the weather station had a clear view of the sky :D.
Server/UI
In order to get the data from the weather station, I set up a Raspberry Pi with an Xbee radio. I wrote a python script to decode the weather data packets and store them in a sqlite database. At first, the only way to view the data was to export it onto a csv file, so I decided to look into writing a web interface to display it instead. Since I have no idea what I’m doing, I had to learn about things like Flask, Bulma, and Plot.ly.
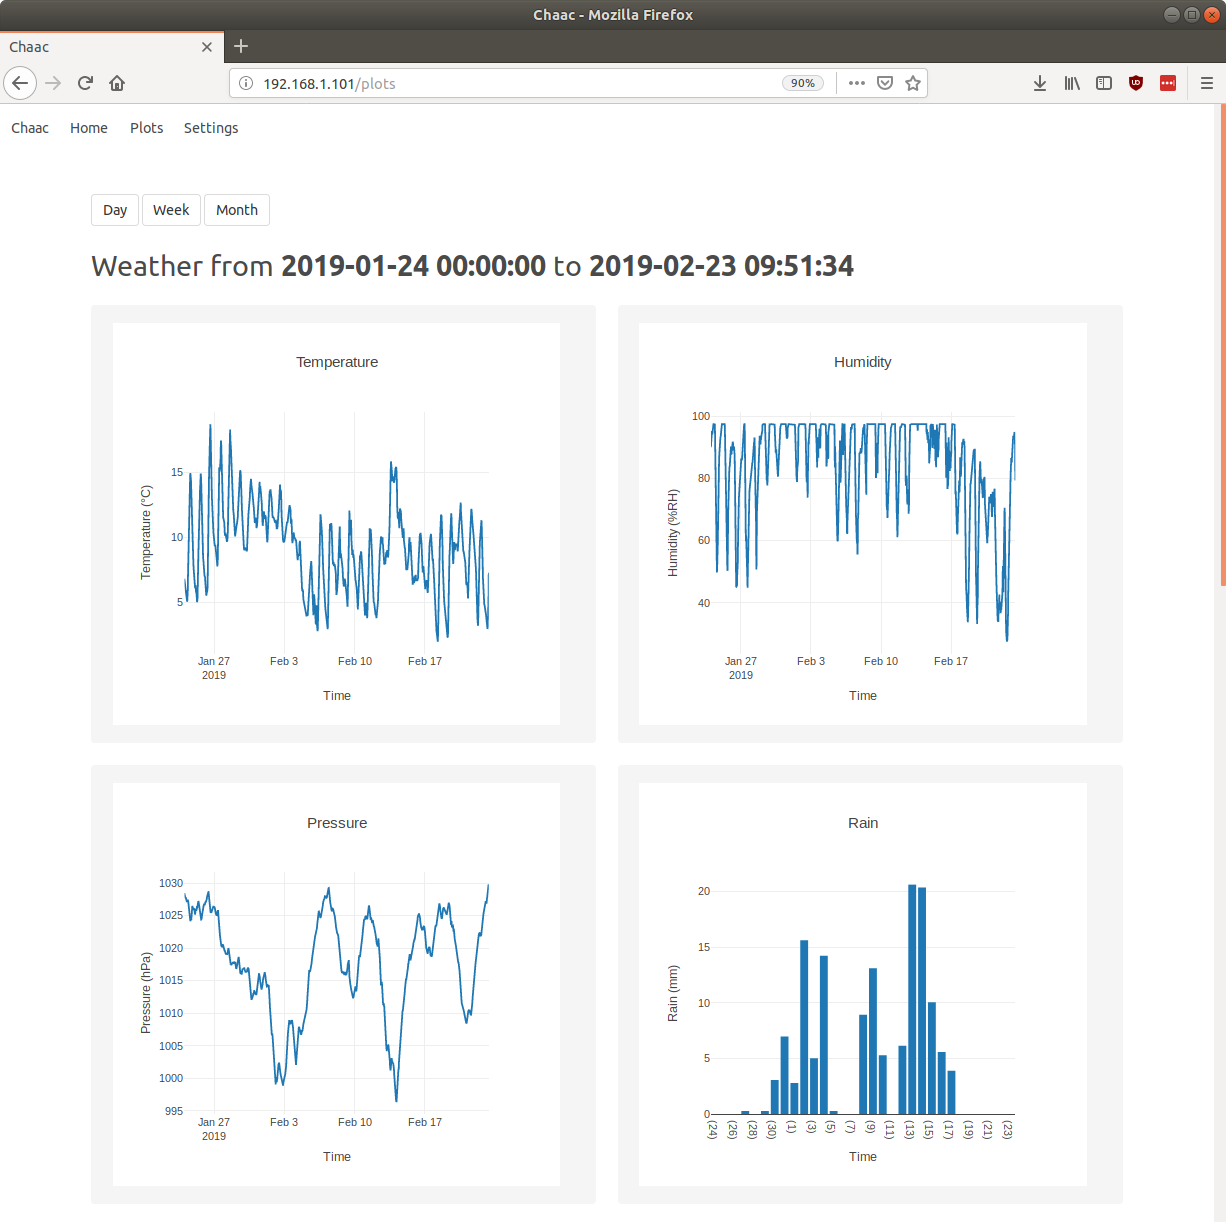
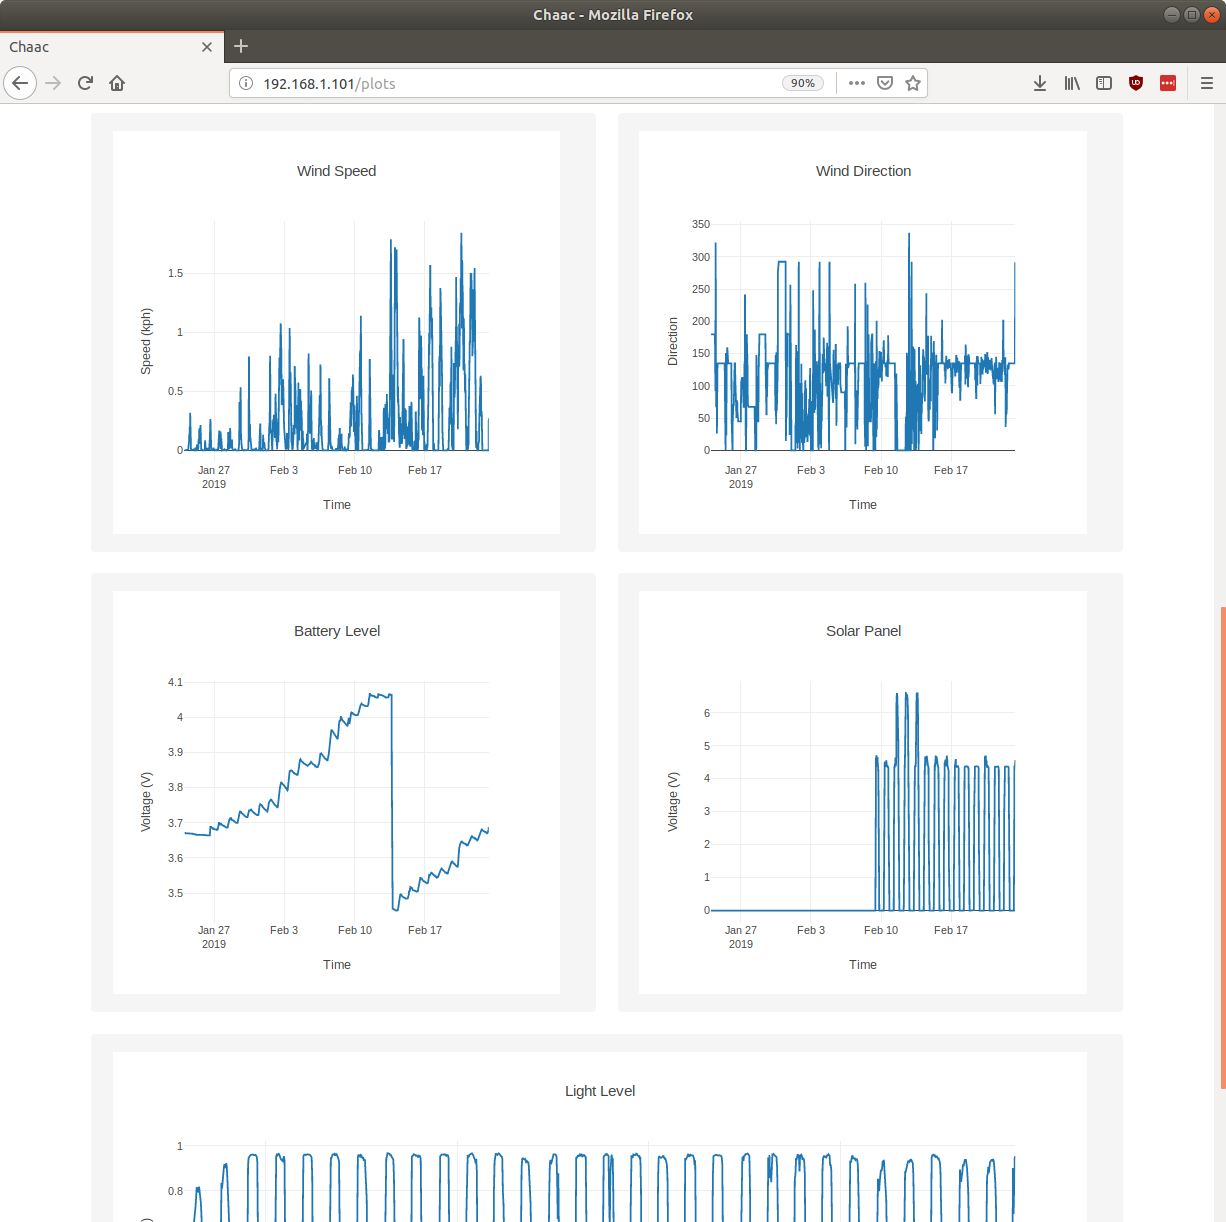
In the end, I came up with something that looks like this:
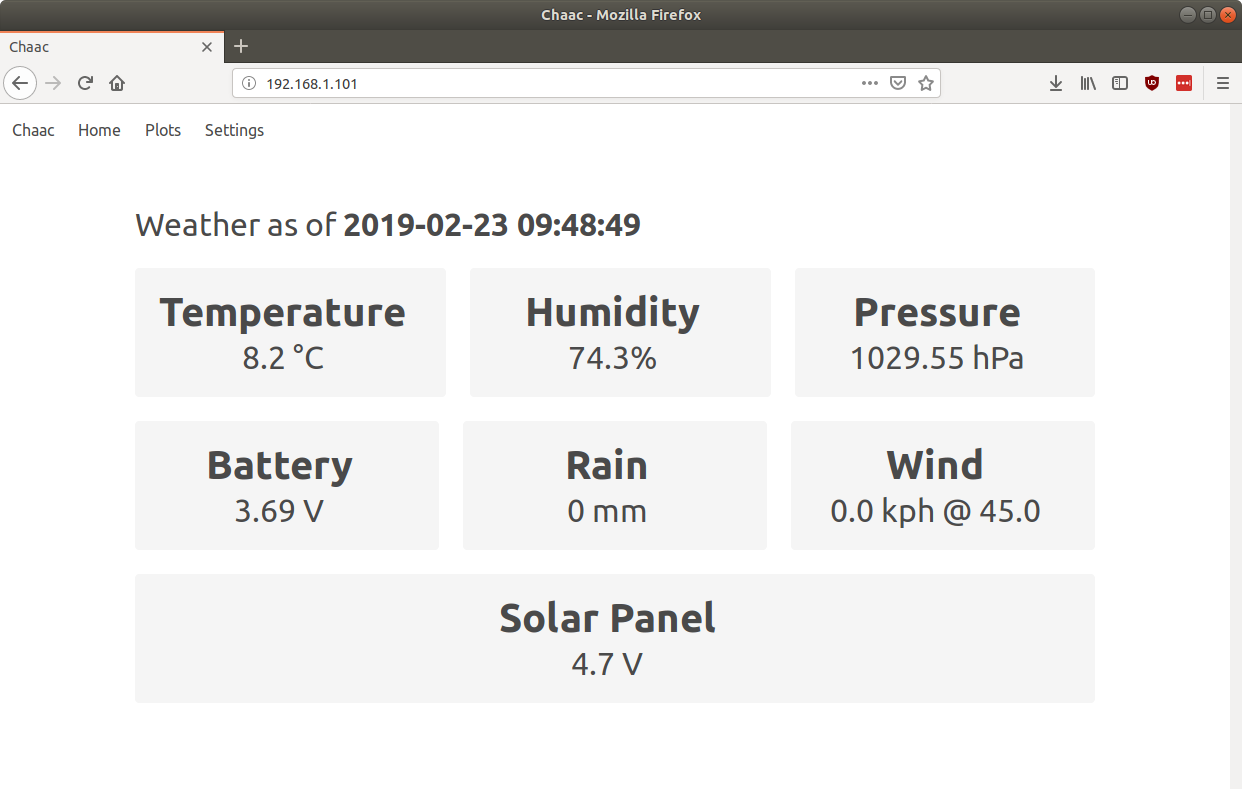
A “summary” page with the latest data as well as a “plots” page with day/week/month data.
So far you need to be on the same network as the raspberry pi to view the data, but I do have plans to make it publicly visible at some point.
Next Steps
Before I keep going, I’m going to take a break from the project to work on some other things. Once I do that, here are some of the things I want to improve/make:
- The web UI could use a ton of work to make it look better
- Use a much smaller battery and solar panel (and therefore, enclosure)
- Make a public UI with data from various weather stations (I want to make more!)
- Use a different radio!
- Make an ultrasonic anemometer :P
- So many more things…
This project has many more things I want to share than I wanted to fit in this post, so maybe I’ll write some follow ups. Some topics I learned a lot about and want to share are:
- Doing a wireless firmware update over the xbee link using MCUBoot
- Getting lower and lower power consumption
- How the web ui and database work
- How the sensors work
- How not to make enclosures :P
Let me know if any of these sound interesting and I can try and focus on those first!
More Information
As with most of my projects, all the source code, schematic/PCB files, etc. can be found on github.